Quick guide to the Ultimate-II+
For German, click here.
Thank you for purchasing the “Ultimate-II+” cartridge: The versatile storage solution for your Commodore 64 computer. Although the installation and use of the Ultimate-II+ are designed to be intuitive, this quick guide shows you the basic functions.
Installation
Take a USB stick, and use a PC or Mac to transfer your favorite floppy disk images (.D64 or .G64 files), tape archives (.T64 files), tape images (.TAP files), Amiga MOD files, SID music (.SID files), or separate programs (.PRG files) to this USB stick.
Insert the USB stick into one of the available USB slots on the Ultimate-II+.
Take the Ultimate-II+, and carefully slide it into the cartridge slot of your C=64. Connect the supplied serial cable between the serial port connector to the serial port of the computer. In case you want to use a configuration with a real drive, connect the computer to the drive first and then use the feed through of the drive to attach the Ultimate-II+ as the last device in the chain.
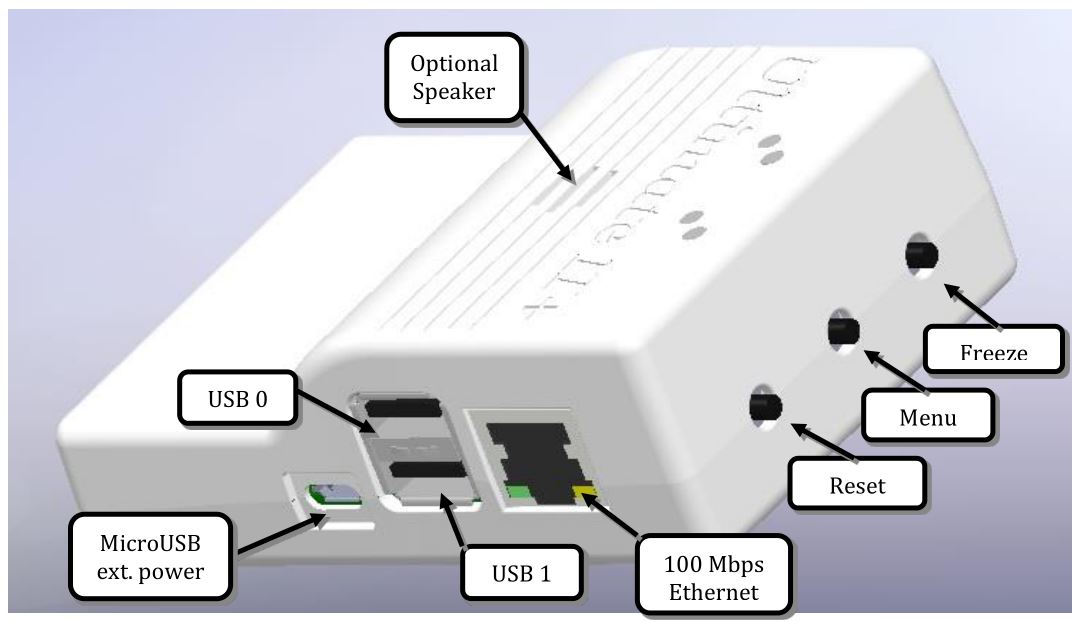
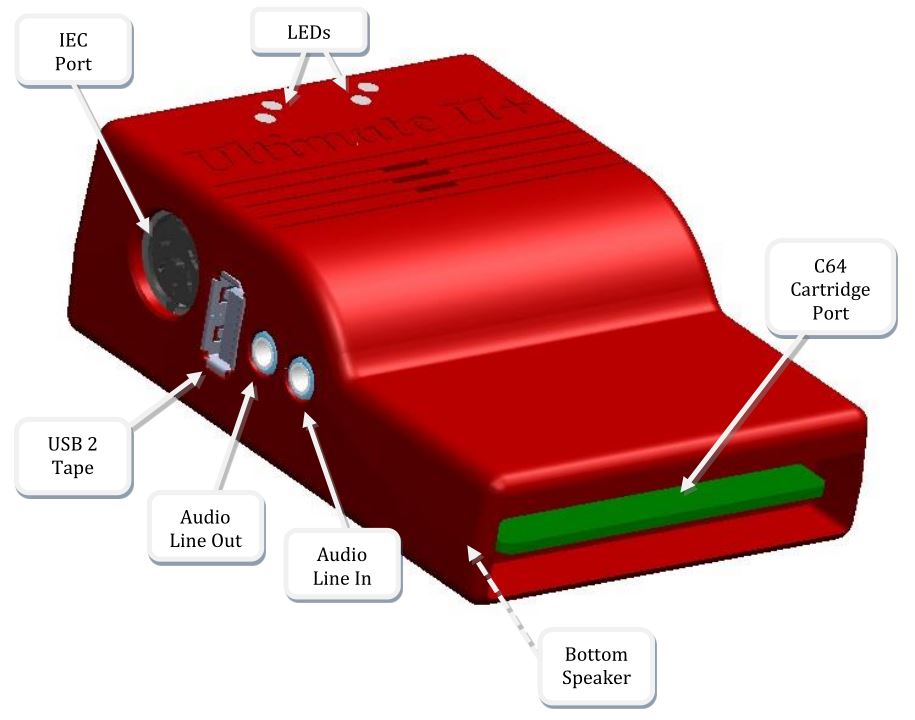
Ports and buttons
Concept of operation
The main feature of the Ultimate-II+ is a cycle accurate implementation of the Commodore 1541 Floppy Disk Drive. This part of the Ultimate-II+ cartridge thus acts exactly like a real drive. It is not any faster or any slower than a real floppy disk drive.
Just like a real 1541 disk drive, the Ultimate-II+ needs “floppy disks”. On the Ultimate-II+, these floppy disks are virtual. These virtual disks exist in the form of a .D64 or .G64 file on a storage device, such as a USB stick. When the user selects such a file, it is linked to the emulated drive. This process is called ‘mounting’. After mounting (which will take a few seconds to complete), the 1541 can access the image file as if it was a real floppy. All standard commands that you are familiar with while using a real CBM1541 then apply.
When necessary, the disk drive can be switched into 1571 and 1581 mode as well. This will happen automatically when the associated file types are selected: Mount a .D71 / .G71 file and the user will be prompted to change the mode of operation to 1571. Similarly for .D81 files, the drive will switch to 1581 mode.
More about mounting disks
Remember that ‘mounting’ a disk means creating a link between the 1541 part of your ultimate cartridge, and a file on a storage device. This means, that when the link has been established, “writes” that the 1541 performs will be written back into the disk image file as well. In this way, the ‘real’ behavior of a floppy is emulated.
This behavior will not always be what you want. There are two options to avoid this: ‘mount’ the floppy as read-only, or ‘mount’ the floppy in ‘unlinked’ mode. When write protected, the drive itself cannot write to the floppy. In unlinked mode, the writes to the floppy are performed, but do not reflect in the .D64 or .G64 file. When the storage device is removed, the 1541 drive automatically switches to unlinked mode. Be aware that writes to the disk will then be lost when you turn off the machine.
LEDs
The Ultimate-II+ has four LEDs that are visible on the outside of the plastic case:
Green: Drive power
Red: Drive status
Yellow: Cartridge active
Green: Storage activity
The drive power LED has four states:
Off: The drive is not powered
Dim: Powered, but no disk mounted
Half bright: Powered and disk mounted, motor off
Bright: Powered, disk mounted and motor running.
Cartridge Emulation
Because the Ultimate-II+ will occupy your cartridge slot, a list of popular expansions available for the C=64 can be configured. Think of extensions like Action Replay, Retro Replay, The Final Cartridge III, Super Snapshot V5, KCS Power Cartridge, the Epyx fastloader and many more. In the configuration menu, even the CBM1750/1764 RAM Expansion unit can be enabled, with expansion RAM up to 16 MB!
Information on how cartridge emulation is set up can be found in this section about cartridges.
Many of these cartridges have a reset button and a freezer button. This is the function of the other two buttons on the Ultimate-II+. By default, the left button is the freezer button, and the button on the right is the reset-button. Through the configuration menu, the buttons can be swapped if desired.
Configuration
As mentioned above, you can enter the configuration menu by pressing ‘F2’ while you are in the menu structure. This will bring up a screen with the following items:
Audio Output Settings
Clock Settings
Memory Configuration
Cartridge and ROM Settings
User Interface Settings
C64 and cartridge settings
Drive A Settings
Drive B Settings
Software IEC settings
Tape Settings
Printer Settings
Modem Settings
Ethernet Settings
WiFi Settings (For U2+L only)
Network Settings
Use the UP/DOWN cursor keys to navigate and RIGHT to enter the desired configuration screen. Once inside a settings screen, the behavior of the keyboard is slightly different:
Key |
Function |
|---|---|
CRSR up/down |
Move the cursor (highlighted line) up/down |
+ / - |
Increase or decrease a setting, cycling through the available options. |
DEL |
Go one level up |
Return / Space |
For string fields: bring up a text entry box For enumerated fields: bring up a context menu with the available options |
Run-stop 2 |
Leaves the configuration menu and saves the new values. |
Note that some values will only take effect after reset or a power cycle of your C=64. However, the main menu provides a way to restart the 1541 and the C=64 with the new settings.
Footnotes
- 2
On VT-100, use backspace instead of RUN STOP
Ethernet
Some of you may be familiar with the RR-net solution that brings Ethernet to the C-64. Currently, the built-in Ethernet port does not provide RR-net compatibility. However:
The Ethernet port (and the WiFi interface for the U2+L with WiFi module installed) is used natively by the firmware. There is some primitive support for file-transfer using FTP, and it is possible to connect to the Ultimate-II+ using a VT-100 terminal program on the Telnet port (port 23). This gives the possibility to control the machine remotely, and swap disks without actually interrupting the program running on the C-64. In addition, the network can be used to connect to the cartridge with a web-browser, and send commands through the HTTP based API.
Modem support
Starting from version 3.7, a lightweight modem emulation layer is provided in the firmware of the Ultimate. This modem layer is accessible through an emulated MOS 6551 ACIA chip. This chip was found in the SwiftLink cartridge, as well as some other ACIA based RS-232 cartridges of the time.
The modem emulation layer bridges the ACIA chip and the LAN port. The modem connects to a server (e.g. one that is running a bulletin board system) through the internet. In order to use this, the modem needs to be enabled in the configuration menu of the Ultimate application, as well as in the terminal program, e.g. CCGMS. The modem will respond to commands such as “ATDT”, which is followed by the domain name, followed by a colon and the port number. For example:
ATDTAFTERLIFE.DYNU.COM:6400
Incoming connections are also supported. This enables you to run a simple server on your C64, or maybe even a BBS!
USB support
The Ultimate-II+ supports most USB sticks and Flash card readers out of the box. It also supports USB 2.0 Hubs. It is recommended to use powered USB hubs only (with an external power supply). USB 1.1 Hubs are not supported.
There are three USB 2.0 ports available on the cartridge; two on the right and one on the left side. Please note that the port on the left is not a USB 3.0 port. Although you may use this port as a 2.0 port, it is not USB 3.0 compliant. The extra signals on a USB 3.0 connector are used to communicate with the tape port (see below). Please do not attempt to attach a USB 3.0 device to the blue USB connector on the Ultimate-II+. You may safely use a USB 3.0 device on the right side of the cartridge.
File Systems
Currently, the Ultimate-II+ supports the FAT16/FAT32 and exFAT file system on any storage device, and the ISO9660/Joliet on CD/DVD ROM drives, or ISO files. It is able to read D64 files, as well as D71, D81 files (no partitions) and DNP files, including sub directories, T64 files.
DMA loads
The Ultimate-II+ is capable of loading files directly through the cartridge port into the memory of your C=64. This is called DMA load. The menu supports loading files of the .PRG type only. It doesn’t matter if the PRG is located on the FAT/ISO file system, or inside a disk image (.D64), or inside a tape archive (.T64). Be aware that a lot of programs inside a .D64 file require that the rest of the disk is mounted in the drive. For those programs, use the ‘Mount & Run’ command.
Important! Because the DMA load requires a bit of software on the C64, a special ‘loader cartridge’ is enabled to perform the DMA. This effectively disables the configured cartridge, so you will lose the speed loader capabilities. If you do not want this, you can go to the basic prompt with your cartridge active, and then select “DMA” on the .PRG file in the menu. This will not invoke the cartridge, but simply attempts to load the program into memory. This will not work for all PRGs, however.
Tape Support
The Ultimate-II+ is capable of emulating a cassette tape deck (CBM1530/1531). To use this function, a special adapter set connects the Ultimate-II+ to the tape port of your C=64 computer. This tape adaptor set can be purchased separately.
In order to play a tape, browse in the menu to a .TAP file, and press enter and select “Play Tape” from the popup menu. This will initialize the tape streamer from the start of the tape. Use functions in the main menu (F5) to pause/resume playback. It is also possible to write the .TAP file to a real tape, using a CBM1530/1531 deck.
The Ultimate-II+ can also capture tape signals into a .TAP file. The ‘F5’ menu will show you the available options.
Audio
The green audio connector on the left side of your device provides a stereo line-out signal. In the configuration menu, it can be selected what is routed to the output channels. Available options include:
Stereo SID;
Ultimate Audio module (for playing samples);
Tape read/write pins (for listening to the tape beeps);
Drive sounds.
Technical note: The emulated stereo SID is taking the CPU writes from the cartridge slot. Unfortunately, there is no way to tell whether the access is made to the I/O region ($D400-$D7FF), or to the RAM below. The necessary signal to differentiate between the two accesses is simply not available on the cartridge port. For this reason, when software uses the RAM in this area, it is possible that you will hear unintended clicks and pops, or even notes.
The blue line-in connector may be used to mix external audio with the output of the Ultimate-II+ cartridge. The separate left and right inputs can be found in the Audio Mixer configuration menu.
Ultimate Audio module
The Ultimate Audio module provides 8 simultaneous sampling voices. This module is utilized as part of the Ultimate-II+ firmware for playing Amiga MOD files. This option is available in the context menu in the file browser.
If you like to do some programming yourself using this sampler, you can enable this module in configuration menu. It then appears in the I/O region. The programming interface is fully documented. Documentation can be downloaded from the official website:
https://github.com/GideonZ/1541ultimate/blob/master/doc/ultimate_audio_v0.2.pdf
Alternate ROMs
The Ultimate-II+ allows you to use other ROMs for both the emulated 1541 drive, as well as the built-in Kernal ROM of your machine. These ROMs are resident (remembered) by the Ultimate-II+ once they are loaded from the file system.
In order to use an alternate ROM, browse in the file system to the binary ROM file that you like to use. The file should have the ‘.bin’ or ‘.rom’ extension. When you press enter, and the file is of the correct size, the option will appear: “Use as..”. Kernal ROMs should be exactly 8K, and drive ROMs should be exactly 16K or 32K.
NOTE: When you use an invalid file as Kernal replacement, the C64 will no longer boot. However, even when the C64 gives a black screen, you can still enter the configuration menu in order to disable the Kernal replacement option.
Software IEC
The Software-IEC module is a serial bus service that can be enabled in the configuration menu. This module provides two additional devices on the Commodore serial bus; the IEC bus:
Virtual drive that gives direct access to the Ultimate-II+ file system;
A virtual printer
Printer
The virtual printer is a valuable contribution created by René Garcia. It takes printer commands from the Commodore 64, and creates a black and white image of the printed graphics and text. This image is then saved to the USB flash drive. The full documentation of the printer emulation and all of its capabilities and options is available here:
https://github.com/GideonZ/1541ultimate/blob/master/doc/ultimate_printer.pdf
Virtual drive
The virtual drive can only be used to access files of the file system, through the OPEN/CLOSE commands on the IEC bus. By default, the path of the IEC drive is ‘/Usb0’, which is the top most USB connector on the right of the unit. This default path can be changed in the configuration menu. When the USB drive contains a program ‘TEST.PRG’, it can be loaded with the basic command LOAD”TEST.PRG”,10. Similarly, you can save your programs with the SAVE command. When loading the directory (LOAD “$”,10), the path will be shown as disk name.
The command channel 15, can currently only be used to change the current directory. Just like on modern systems, “..” is the parent directory and “/” is the root directory:
OPEN 15,10,15,”CD:/USB1/MYPROGRAMS”:CLOSE 15
Note that since version 3.11, the SoftwareIEC also supports the JiffyDOS protocol. Command compatibility with CMD-HD and SD2IEC is planned for firmware 3.15.
Ultimate Command Interface
Since some time, it has become possible to control the Ultimate-II+ programmatically through the I/O port of the C64, thus from a program that runs on the machine. This is useful for many things; for example it can be used to access the file system much faster than through the serial bus. But it can also be used to load files from the file system into REU memory for example. The set of commands grows over time and will provide more and more powerful features.
Documentation of the interface and the command targets is available here:
Real Time Clock
For getting correct time stamps on the files that are created on the USB pen drives, the Ultimate-II+ offers a real time clock (RTC) function. This RTC can be set through the configuration menu.
The RTC is powered by a CR2032 battery, which is located inside of the unit. Calculations show that the lifetime of this battery is several years.
Firmware Updates
In order to update the firmware, you will need a file with the “.U2P” extension, or “.U2L” for the Ultimate-II+L. Such a file can be found in the ‘.zip’ archives found in the download section of the http://ultimate64.com website, after logging on to the site.
Procedure: Use the Ultimate-II+ file browser to find the .U2P / .U2L file. Press ENTER, and the option “Run Update” will appear. Select this option and follow the instructions, if any. After running an update, the unit will reset itself completely after about a minute, without any notification. This is normal behavior.
When, for some reason, the update has failed and corrupted the Flash chip; you can start the “Recovery Mode”, by holding the middle button while powering on the unit. In the recovery mode, not all features are available, but the “Run Update” feature should work. (Not available on U2+L!)
Disclaimer
The ‘firmware’ on your Ultimate-II+ board consists of a rather large number of functional parts that all work together. Although an insane number of hours have been put into testing and improving the firmware and software, I am very certain that it still has bugs. Some testing work still needs to be done. The device will be improved further as time passes. Check the download section at the website for the newest firmware version. We believe in the end this will sure be the ‘ultimate’ storage solution for your 8-bit Commodore computer.
Known issues
The processing speed of the Ultimate-II+ is currently (V3.10) still quite a bit lower than the Ultimate-II. This is because the Ultimate-II+ platform does not have instruction/data caches still on its embedded processor. The lower speed may cause some situations in which the unit appears to hang, while it is just busy. For example, when using the printer emulation, the conversion from a bitmap image to a PNG file can take quite some time. This may be solved in a future software upgrade.
Other issues are reported and maintained on GitHub:
Social Media
For quick answers to many questions regarding your device, you may be interested to join the the Facebook group “Ultimate 64”.